
How To Create Links In Email Campaigns
There are three (3) kinds of links you can create in your email campaigns. The first link is linking to a website. The second is linking to another section in your email (called an ”anchor“), which is particularly useful if your email is long and you want to make it easier for the reader to navigate around the email. The third is linking to an email address. In this article, we deal only with text, but images can also be turned into Links and Anchors in the same way.
To link to a Website:
- When you are editing the HTML version of your email campaign, select the text you want to turn into the Link.
- Click on the Create Link Icon. This is the icon on the first row of editing tools, and it looks like a Globe with a connected chain in front of it.

- When the window pops up, select URL in the Link Type drop-down menu, then enter the address of the website you want this text to link to in the URL field.
- Click on the Target tab and choose the target type you want. We recommend that you always use New Window (_blank) however you can experiment with different targets to get the effect you want.
- Click OK.
The text will now be blue in colour, and underlined, indicating that this text is now linked. You can edit or remove the link by right-clicking on this text. When your email recipient clicks on this piece of text, their Internet browser will open and they‘ll be directed to the website.
To link to other sections in your Email Campaign:
Note: Imagine the Link is the starting point and the Anchor is the end point. When people click on the Link, they will be sent to the Anchor.
- When you are editing the HTML version of your email campaign, select the text you want to designate as the Anchor. This is where the email recipient will be taken to when they click on the link. If you have headings in your email, these usually make the best anchors.
- Click the Anchor Icon. This is the icon directly right of the Link Icons that looks like a flag.
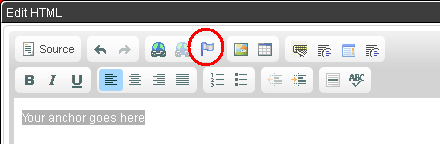
- Give the Anchor a name that you will easily recognise.
- Click OK. The text will turn into an icon in this view, but it will still appear as text on your Email Campaign.
- Select the text you want to turn into the link.
- Click on the Create Link Icon (see the diagram at the top).
- When the window pops up, select Link to anchor in the text in the Link Type drop-down menu, then click on the drop-down menu under By Anchor Name and select the Anchor you have just created.
- Click OK.
The text you turned into the link will now be blue in colour, and underlined, indicating that this text is now linked. You can edit or remove the link, or edit the anchor by right-clicking on them. When your email recipient clicks on the link, their email will scroll to the Anchor text.
To link to an Email Address:
- When you are editing the HTML version of your email campaign, select the text you want to turn into the Link.
- Click on the Create Link Icon (see the diagram at the top).
- When the window pops up, select E-mail in the Link Type drop-down menu.
- Type in the E-mail address you want the recipient‘s email to be sent to, the Message Subject and the Message Body.
- Click OK.
When your email recipient clicks on the Link, their default email program will open and create an email with the E-mail address, Message Subject and Message Body already filled in. This is useful for things like ”Request a Support Call“ or other emails that only require a generic message.