
How to Create a Survey
To Create a Survey, first step is to fill in the survey settings on the survey details screen. Below is how to do this.
- Click on Surveys from the left menu when you are logged into your Database Marketing account.
- Click on the Create New Survey blue button at the top left of the surveys page.
- On the Survey Details screen fill in the details you need. Below is what each element is for on the details screen.
- Survey Name: Name of the survey for back end reference.
- Survey Logo: You can add a logo that will be displayed at the top of the survey on the website.
- Limit Response: You can set the character limit of any text response fields.
- Cut Off Date: This is hen the survey will finish and be removed from the website.
- Show Progress: If set to Yes there will be a progress bar on the survey when being filled in on the website.
- Can Save Progress: Set this option to Yes if you want the survey respondent to be able to save their progress and come back at a later time to finish the survey.
- Question Numbering: Set this to Yes if you would like all survey questions to be numbered.
- Notify On Completed Responses: Set this option to Yes if you would like an email address to be notified once the survey has been completed.
- When User Completes Survey: When the survey is finished there are 2 options that can happen upon completion.
- 1. Confirmation Message: Add a confirmation message to the message box provided and this will display on the page after completion.
- 2. Redirect to URL: Redirect the user to another page on your website or even to an external URL once the survey has been completed.
- Survey Template: If your website has different templates created you can choose which template to display by using the drop down box.
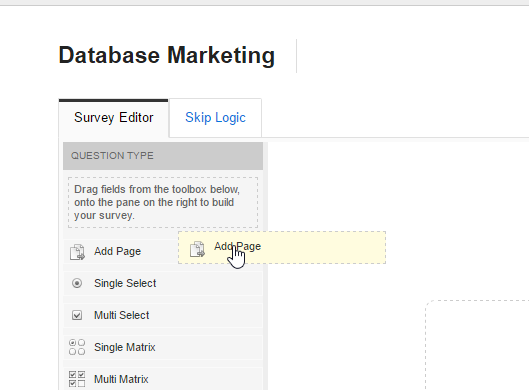
Once you have completed the survey settings you will be directed to the Survey Editor section. Here you will notice there is a left section containing the survey elements used to create the survey with drag and drop functionality. To start the survey you need to drag over a page for the elements to be contained in. Mouse over the Add Page element and drag it to the right and drop it anywhere within the editor.
Below are what the elements are and what they are used for:
- Single Select: This is a radio button that is used for showing a range of answers but only allowing one answer to be chosen.
- Multi Select: This is a check box element that allows multiple answers to be added and also allows multiple answers to be chosen.
- Single Matrix: This is a radio button element that allows the addition of rows and columns. This element will only allow one answer per row to be selected.
- Multi Matrix: This is a check box element that allows the addition of rows and columns. This element will allow more than one answer to be chosen per row.
- Multi Select Matrix: This is a drop down element that allows the addition of rows and columns.
- Rating Scale: The rating scale element is a drop down element with ratings from Very Poor to Perfect and options in between.
- Small Text: This is a small box element used to get small written answers.
- Large Text Box: This is a large box element to get larger written answers.
- Date: This is used to select a date as an answer.
- File Upload: This is used to get the user to upload a file such as a PDF or Word Doc.
- Static Text: This is used to add written content in sections of the form.
- Image: This is used to upload an image file such as a JPG or PNG.
- Drop Down: This is a single drop down element which can have multiple answers added to it.
If you require certain questions to be hidden or show when certain answered are chosen, you can do this by using Skip Logic. To learn how to use Skip Logic please Click Here for the full instructions.
To publish and distribute your survey follow these instructions.